Page 9: Space-Age Sculpture Museum
CS559 Spring 2023 Sample Solution
Box 1: Exercise 5, Curate your own Museum!
In this part of the assignment, we give you some starter code for a “museum.” It has pedestals to display things, spotlights to shine on them, and cameras to look at each thing in more detail. The only problem - this museum doesn’t have much on display. We say “space-age” because the objects magically float above their pedestals.
Your job is to add some new objects for museum visitors to see. We’ve given you one simple object to start with. You must add three more objects, to fill the other three pedestals.
You may build these objects up from primitives as you did with the snowman, or you may import any of the sample objects in the for_students/objects/ folder included in the project. Please do not import objects you find online. We need to limit the number of items to download for grading.
As with the snowman, you can use simple materials of different colors (e.g., MeshPhongMaterial or MeshStandardMaterial. Again, the point is not to have the fanciest material, just try different settings out and see what you come up with.
Now, it would be boring if the objects simply sat on the pedestals. You will add a cool sci-fi effect and set each object to float just above its pedestal, spinning slowly in place. If you want the effect to be more convincing, you could (optionally) embellish the motion by making the objects bob slightly, as if they were suspended in some kind of energy field.
In addition, you will need to adjust the position and rotation of the provided spotlights and cameras such that each spotlight shines on one object, and cameras 1, 2, 3, and 4 each point at one object. The “main” camera should remain in the same position and orientation.
Recap of requirements:
- Add three objects (built from primitives or imported from
for_students/objects/folder). - Give each object a material.
- Make each object float and slowly move above its pedestal.
- Move each spotlight to shine down on one of the objects/pedestals.
- Move each camera (other than “main”) to point at one of the objects.
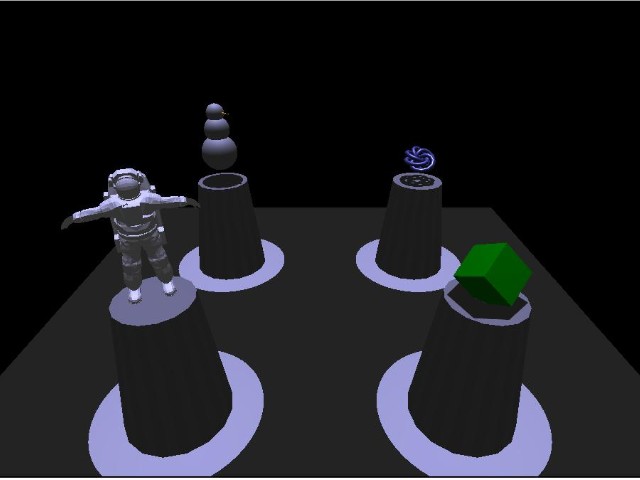
A basic example (from the main camera view) is shown below:
We’ve given you a start in 06-09-01.js ( 06-09-01.html) where you should put your code. Some details of the starter code are given below.
The program sets up the basic scene with drawing the ground and the pedestals, and setting up a window for drawing. It also provides a basic animation loop.
The code makes a first object (a cube) so you can see how to make an object. You can keep the cube, or replace it with something more interesting. You need to make 3 other objects (not cubes) and make them move (small, slow movements).
There is an “animate” function, where you should add the code that makes your objects float and rotate above their pedestals.
Note: we turn on shadows in the starter code. You can safely ignore this - you do not need to make shadows work on your objects and lights. You can copy what we did for the example objects (it’s not hard), but we will not give you extra credit for doing it. We will explain how shadows work (and why turning them on requires several steps) later in the semester.
Ground Rules for Workbook 6
For the programming assignment, we are going to ask you to make some pictures by writing programs that use THREE. We want you to focus on using the parts that we’ve discussed, not trying to show off that you can figure out the fancier features on your own.
You must:
- Use one material per primitive object.
- Use solid colors (no textures).
- Use only built-in shapes (do not make your own meshes).
- Do not use reflections.
- You do not need to add shadows (but you can keep the ones we have in the starter code)
- Do not add other object models (although, you can use the sample ones we provided).
- Do not make your own new kinds of materials (by writing shaders).
You’ll get to do all of these things later in the class. For now, you can be creative and make sure you understand how to put together the basic pieces.
The end!
This is the end of the workbook. Don’t forget to commit and push your work to GitHub, and to do the hand-in survey on Canvas. Workbook 06 Handin (due Mon, Mar 27)
While this is the end of the workbook, it is just the beginning of our adventures in 3D graphics programming.